

Create your Apple Developer account and invite OpenCourt
Set up the Apple Developer account your branded (white-label) iOS app is published under, and give OpenCourt access.
Your branded app is published on the App Store under your business's name, not OpenCourt's. Apple requires the business whose content is in the app to own the developer account that submits it — so you create the account, then invite us in. After that we handle the build, submission, and every update. You won't touch it again except to renew once a year and accept the occasional Apple agreement.
Budget 2–4 weeks end to end. This is the longest-lead item in your app launch and none of it can be rushed, so start it the day you sign with us.
Before you begin — gather these
- Your legal entity name, exactly as registered — including the suffix (Inc., LLC, GmbH). Not your DBA, not the name on your sign. This becomes the "seller" name on your App Store listing.
- Your D-U-N-S number — a free, nine-digit business ID Apple uses to verify your company. You may already have one. Look it up (or request one free) with Apple's D-U-N-S lookup tool — through Apple's tool a new number takes about 5 business days, plus 2 more for Apple to sync it. See our D-U-N-S guide. This is the longest-lead step, so do it first.
- An Apple Account with two-factor authentication turned on, registered with the enroller's legal first and last name — not a nickname, not the company's name. (Turning on two-factor authentication requires an Apple device, and it's different from Apple's older "two-step verification.")
- A work email on your company's own domain (you@yourcompany.com). Gmail/Yahoo/Outlook addresses are not accepted. Apple emails a one-time code to it mid-flow.
- A live website on that same domain. A Facebook page, an Instagram profile, a "coming soon" placeholder, or a registrar parking page will all be rejected.
- A phone number Apple can reach you on.
- Signing authority — the person enrolling must be able to legally bind the company to contracts (owner/founder, executive, or a delegated signatory).
- Documents, scanned and ready (Apple asked for all three on our last run): your government-issued photo ID, proof you work for the company (employment verification), and one business document for the entity — Articles of Incorporation, business license, Certificate of Formation, charter documents, notarized partnership papers, or a reseller/vendor license. Colorado and Florida only: E-File Articles of Incorporation and Certificate of Status. Nonprofits: also your IRS tax documents.
- USD 99 for the annual membership — you don't pay until Apple approves you.
Step 1 — Register as an Apple developer
Go to developer.apple.com/register. This is the free Apple developer registration — the front door to enrollment, not the paid membership itself.
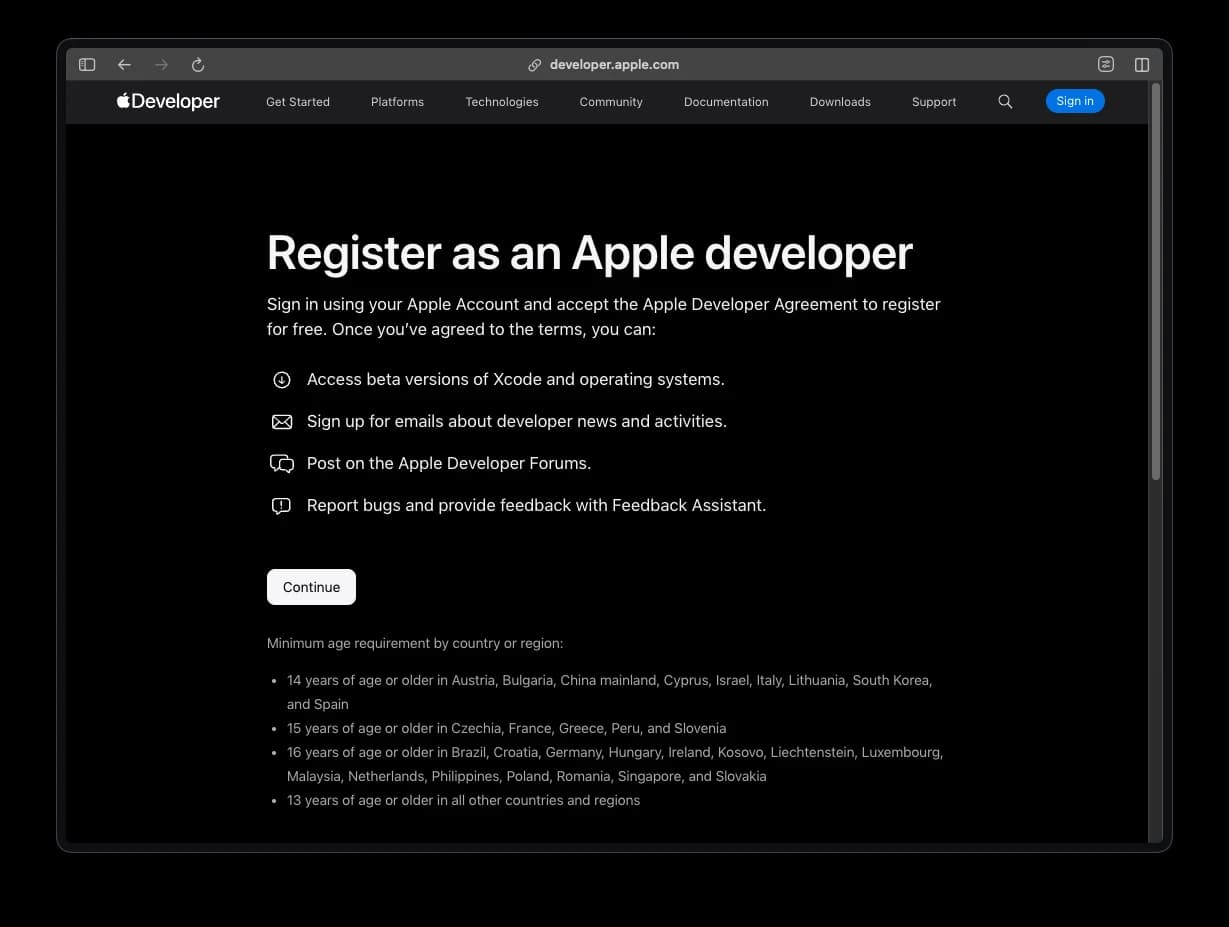
Click Continue. You'll be taken to the Apple sign-in screen.
Step 2 — Create the company's Apple Account (or sign in)
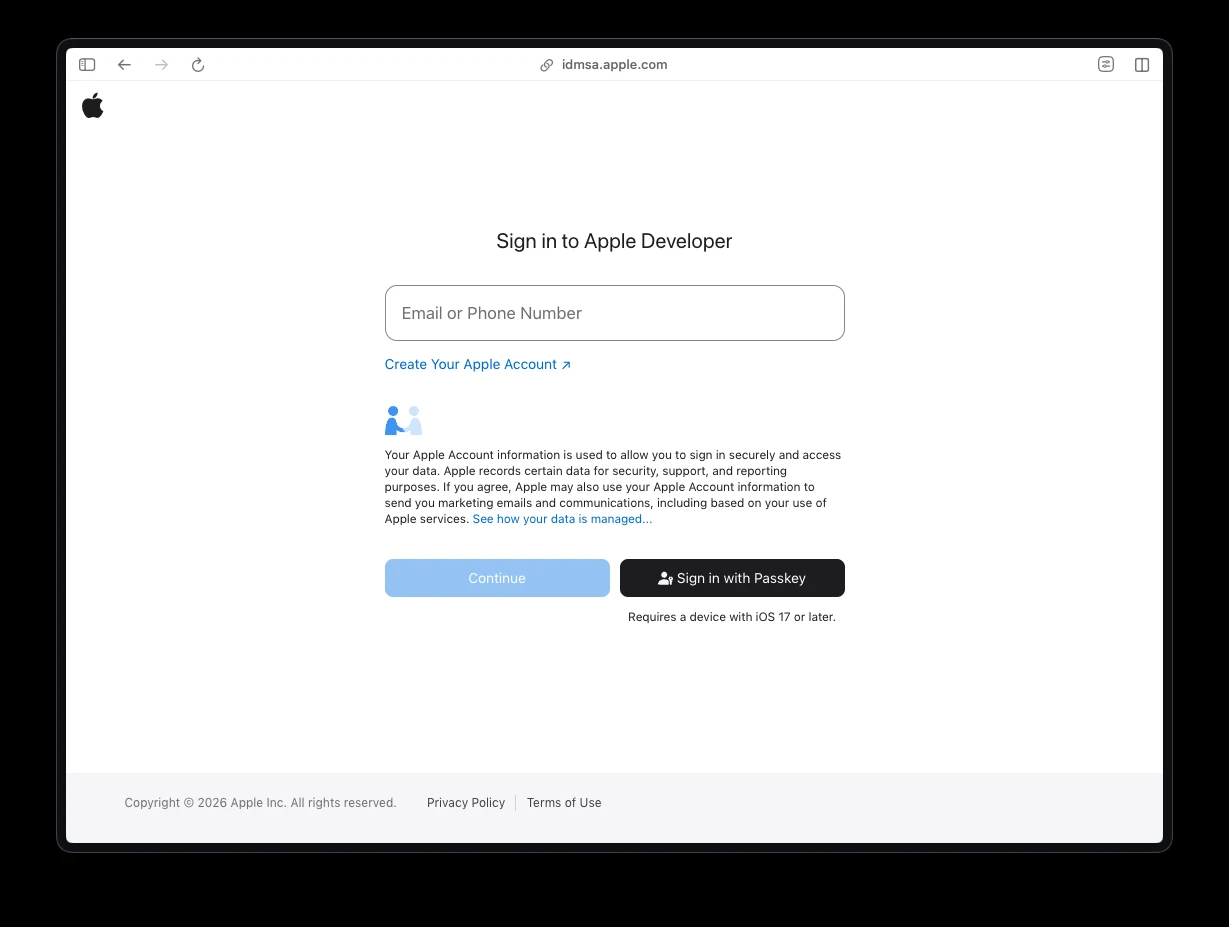
If your company already has an Apple Account it wants to use, sign in. Otherwise click Create Your Apple Account.
Step 3 — Fill in the account details
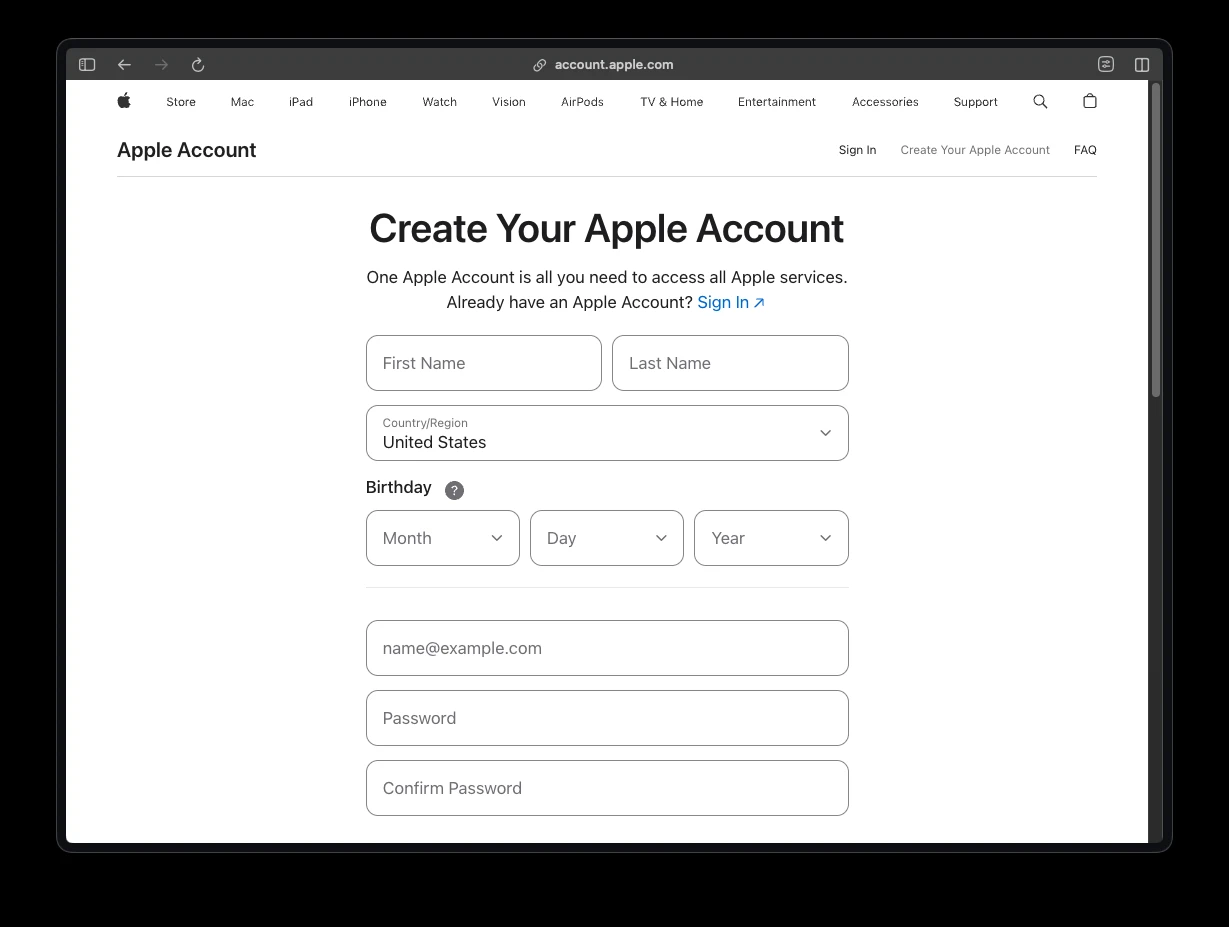
Enter the authorized person's legal first and last name, country/region, birthday, the company email address, and a password. Apple emails a verification code to that address — enter it to confirm the email, finish creating the account, and turn on two-factor authentication if prompted.
Step 4 — Agree to the Apple Developer Agreement
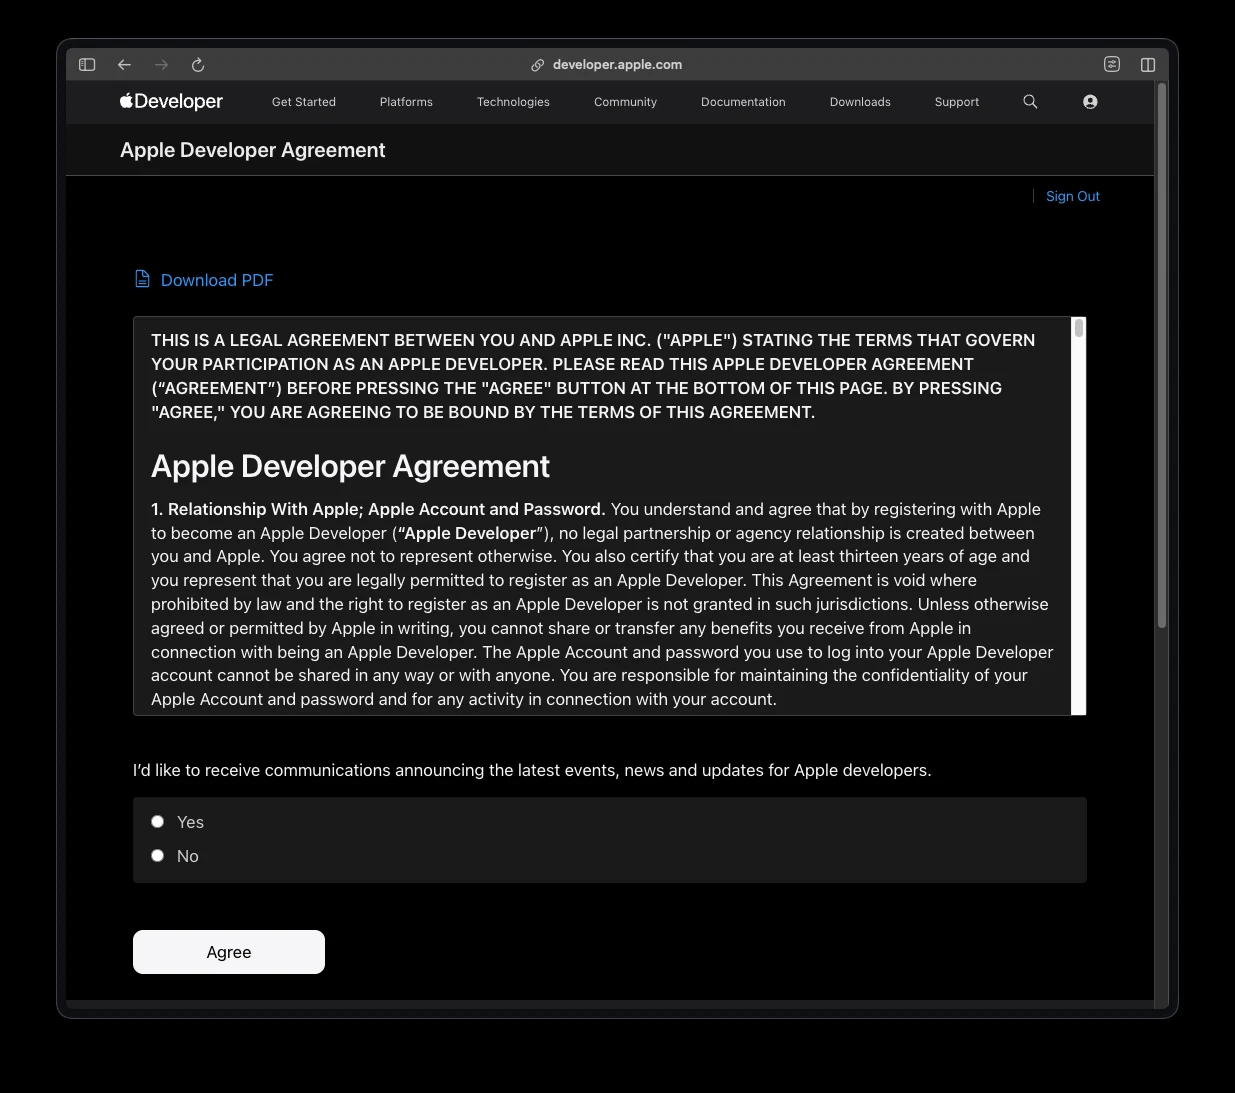
Once your account is created and you're signed in, Apple shows the Apple Developer Agreement. Read it, choose whether you'd like marketing emails (either is fine), and click Agree.
Step 5 — Skip the profile prompt
Apple offers to set up a personalized "developer profile." You don't need it for this — click I'm not interested (or "Remind me later").
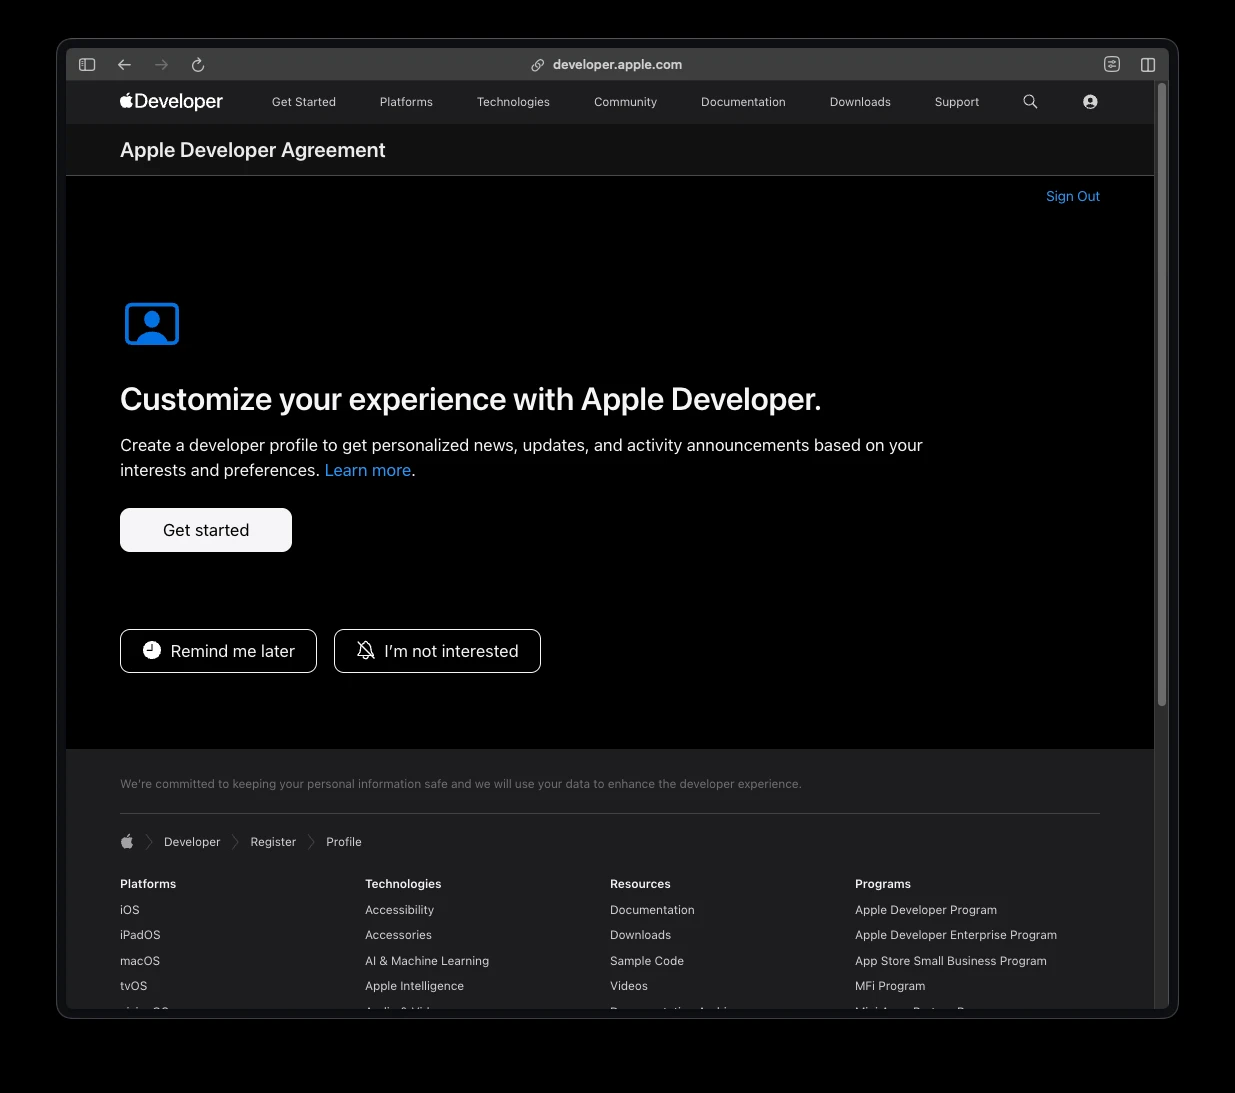
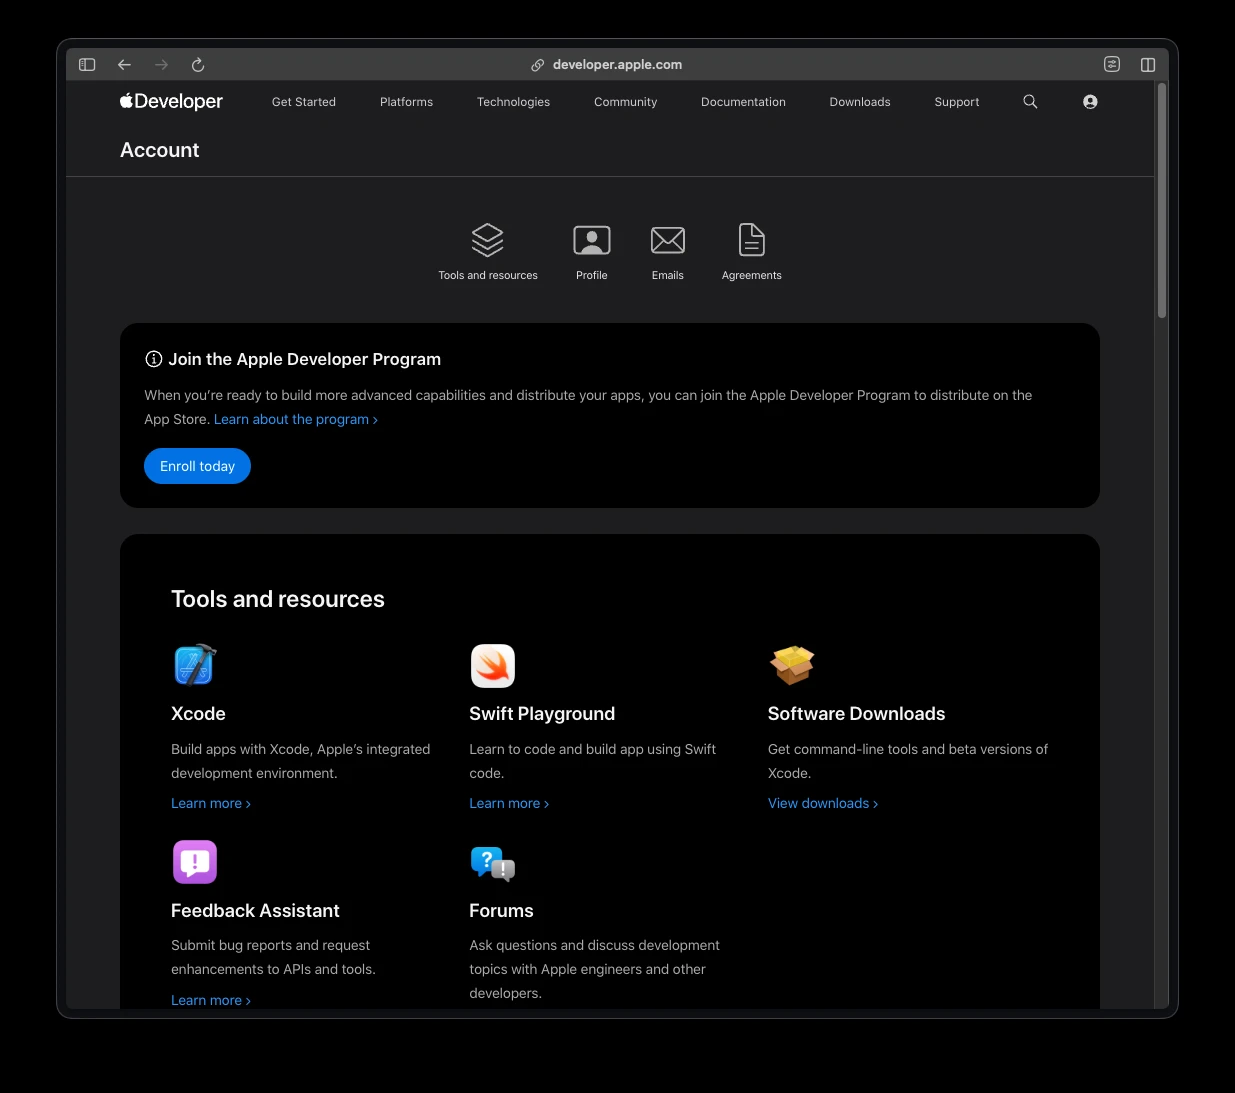
Step 6 — Start the enrollment
On your Account page, find the Join the Apple Developer Program box and click Enroll today.
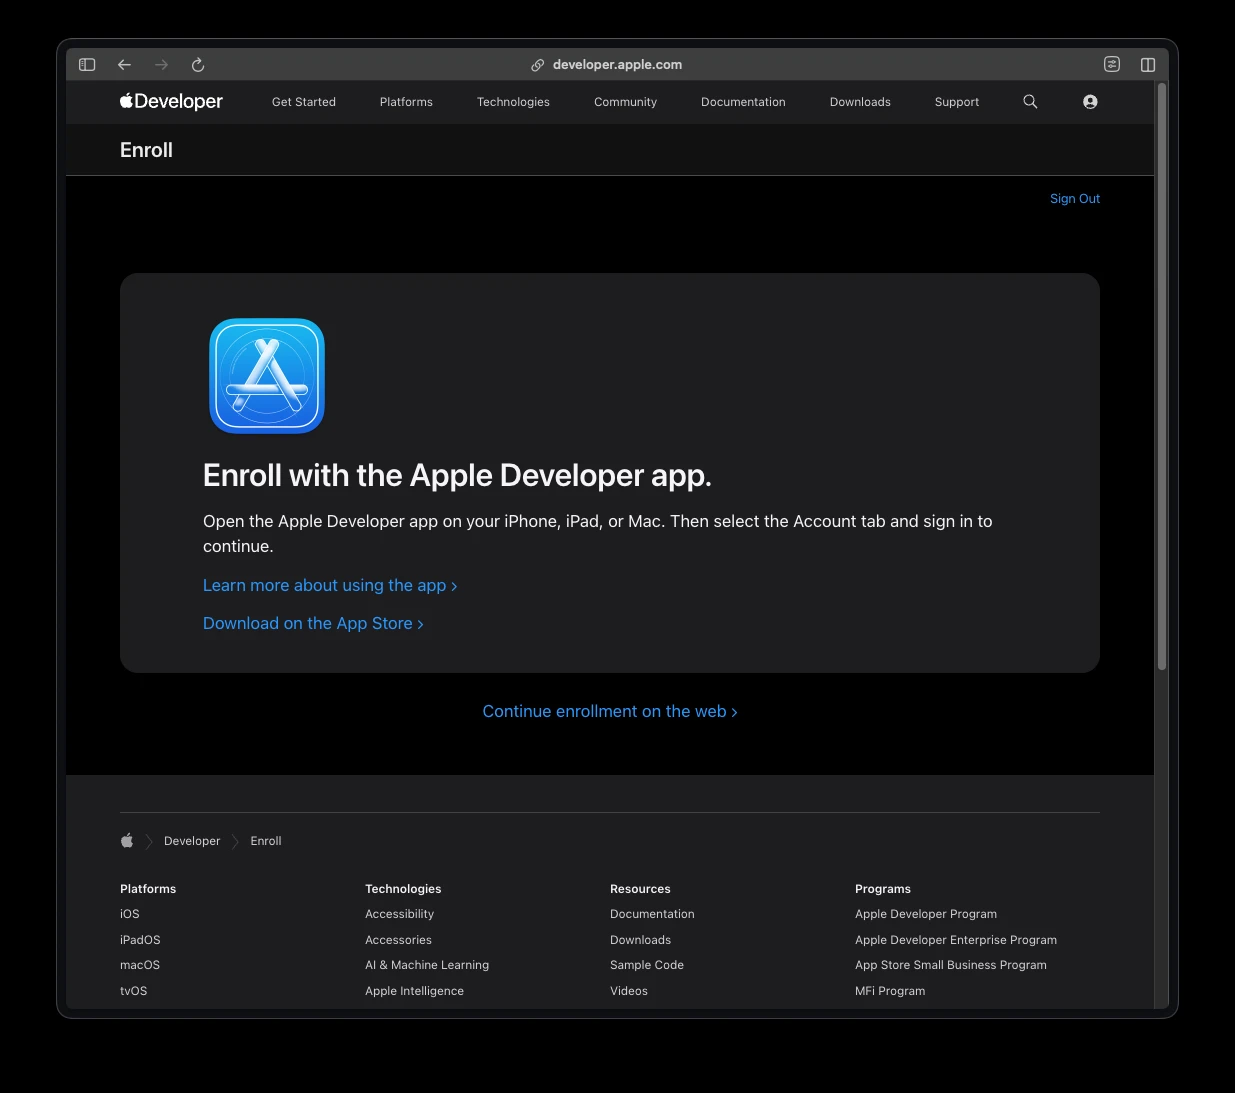
Step 7 — Continue enrollment on the web
Apple suggests enrolling through the Apple Developer app, but the web works fine. Click Continue enrollment on the web.
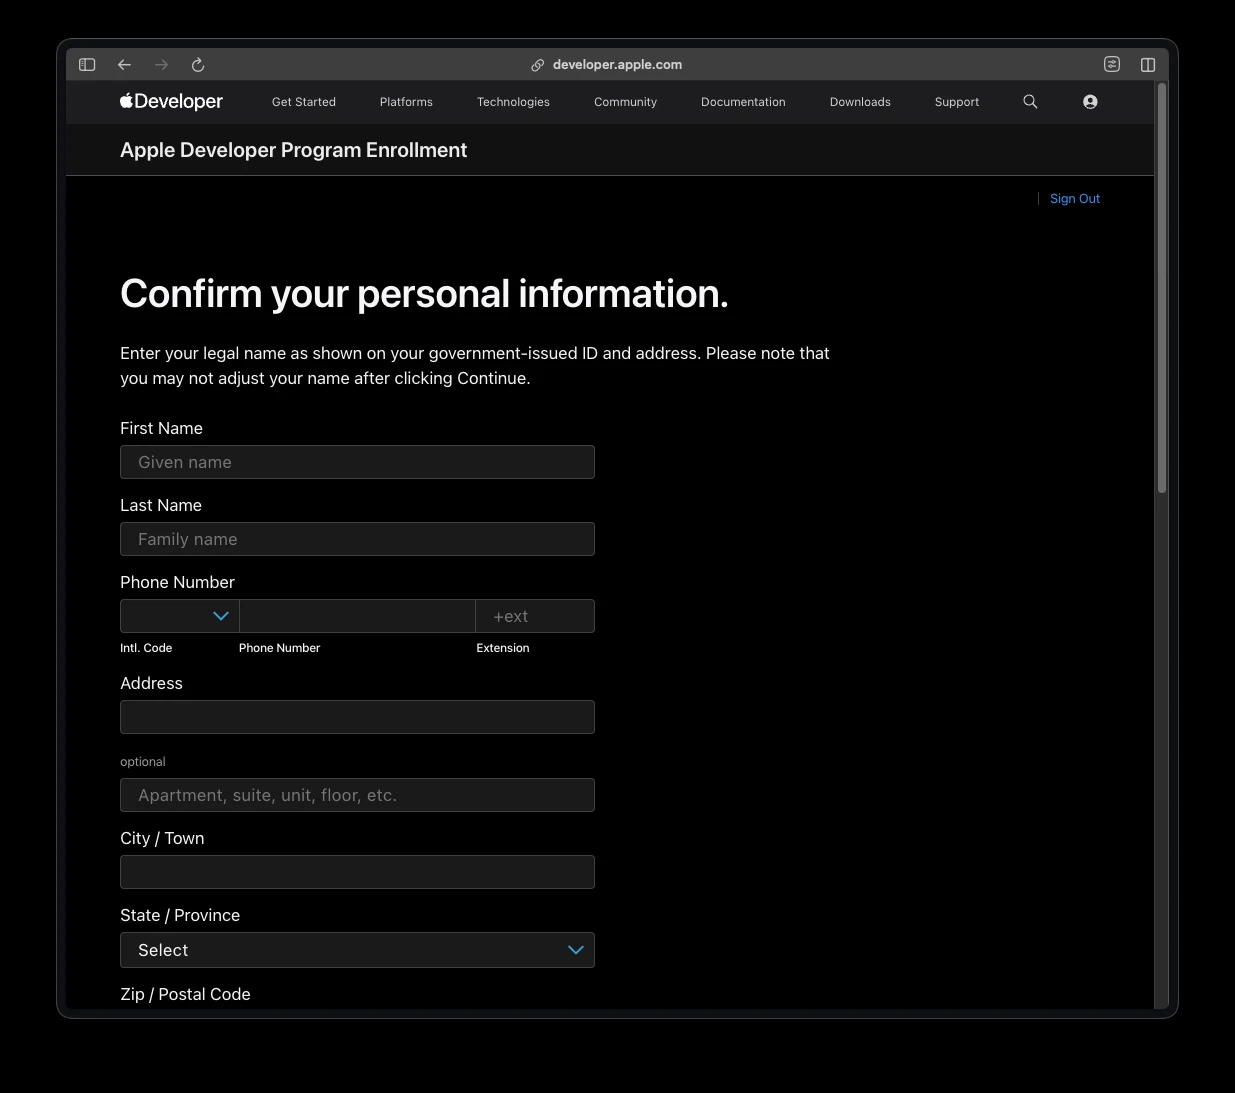
Step 8 — Confirm your personal information
Enter the authorized person's legal name (as shown on their government-issued ID), phone number, and address.
Step 9 — Select "Company / Organization"
Under I develop apps as, choose Company / Organization.
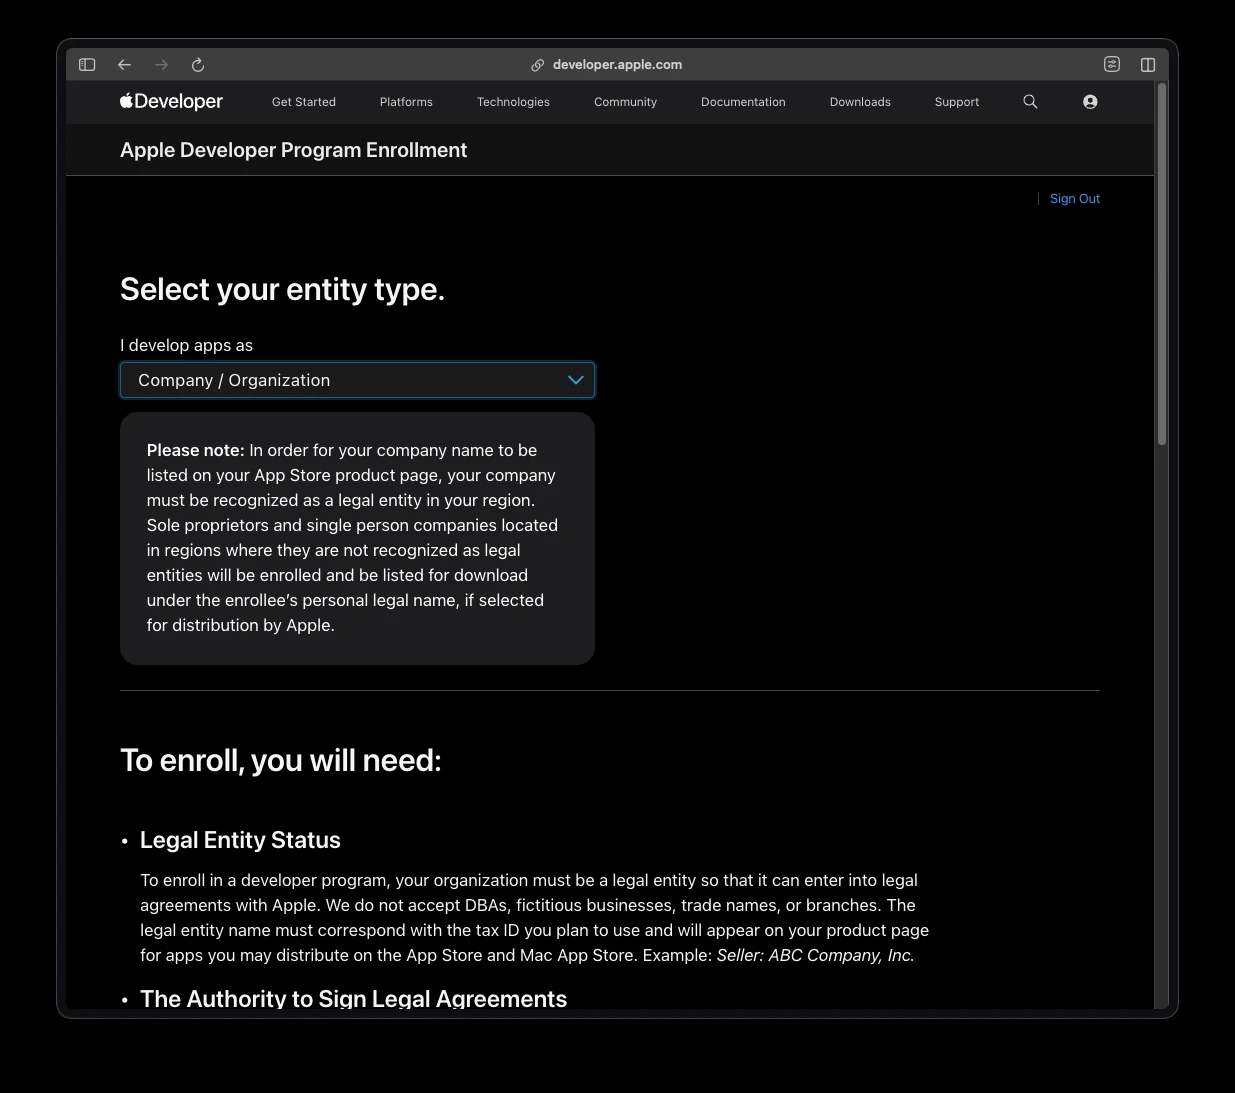
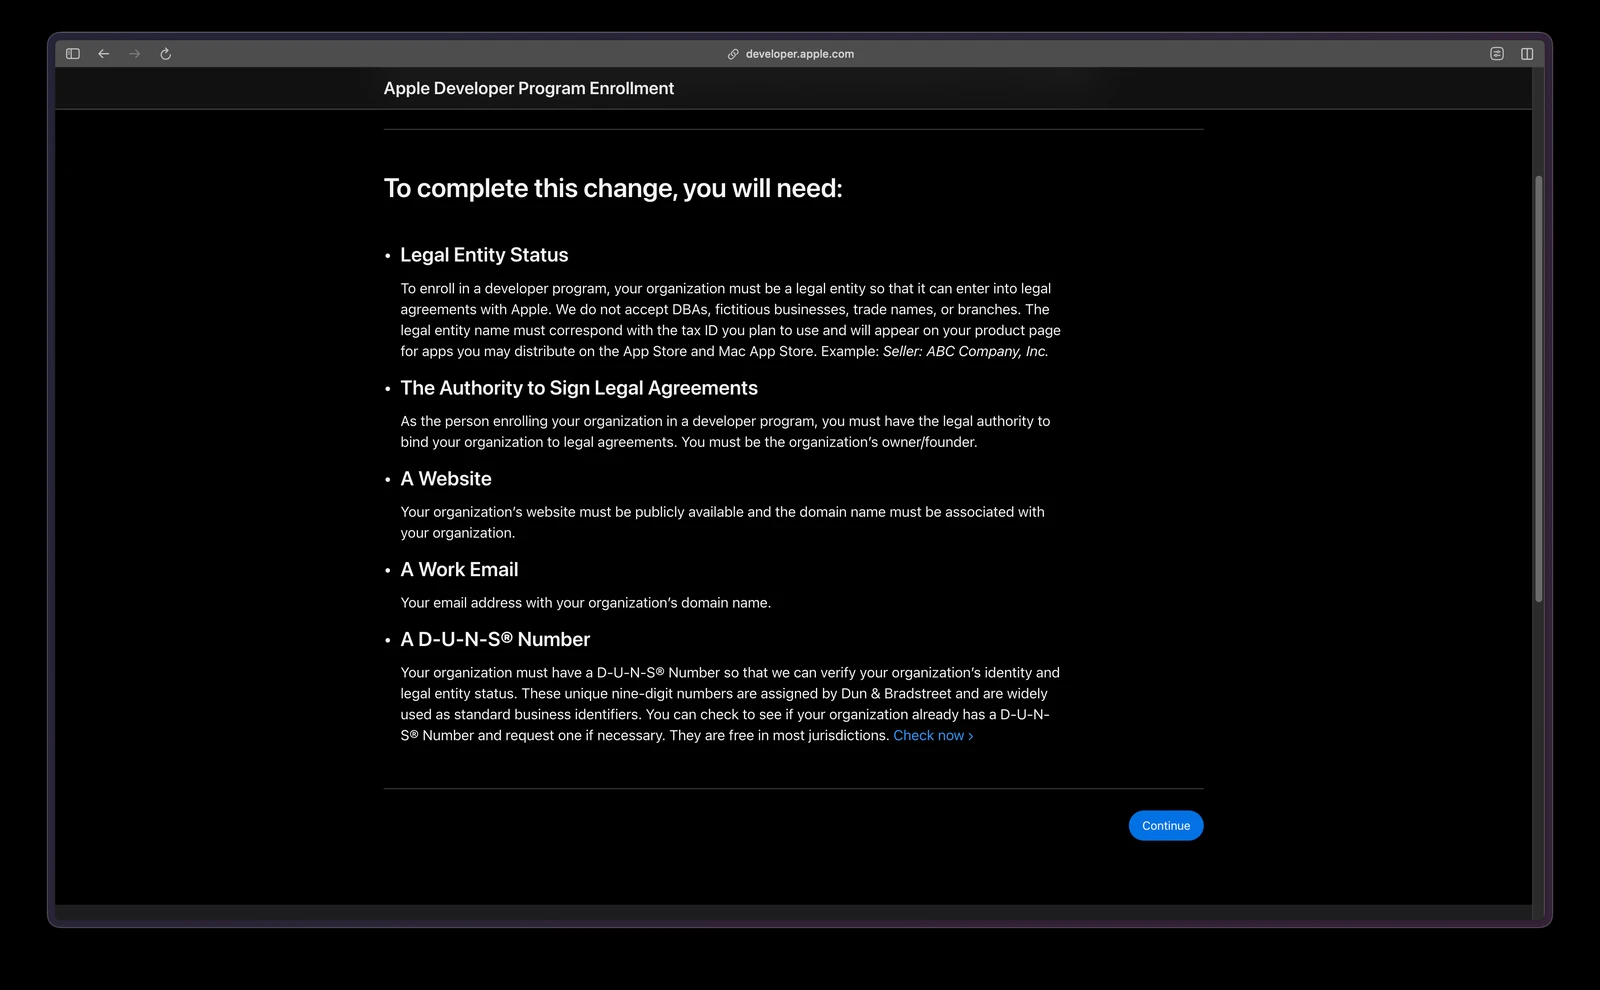
Apple then lists what you'll need to finish — legal entity status, authority to sign, a website, a work email, and a D-U-N-S number (with a Check now link to look one up). Click Continue.
Step 10 — Enter your legal entity name and D-U-N-S number
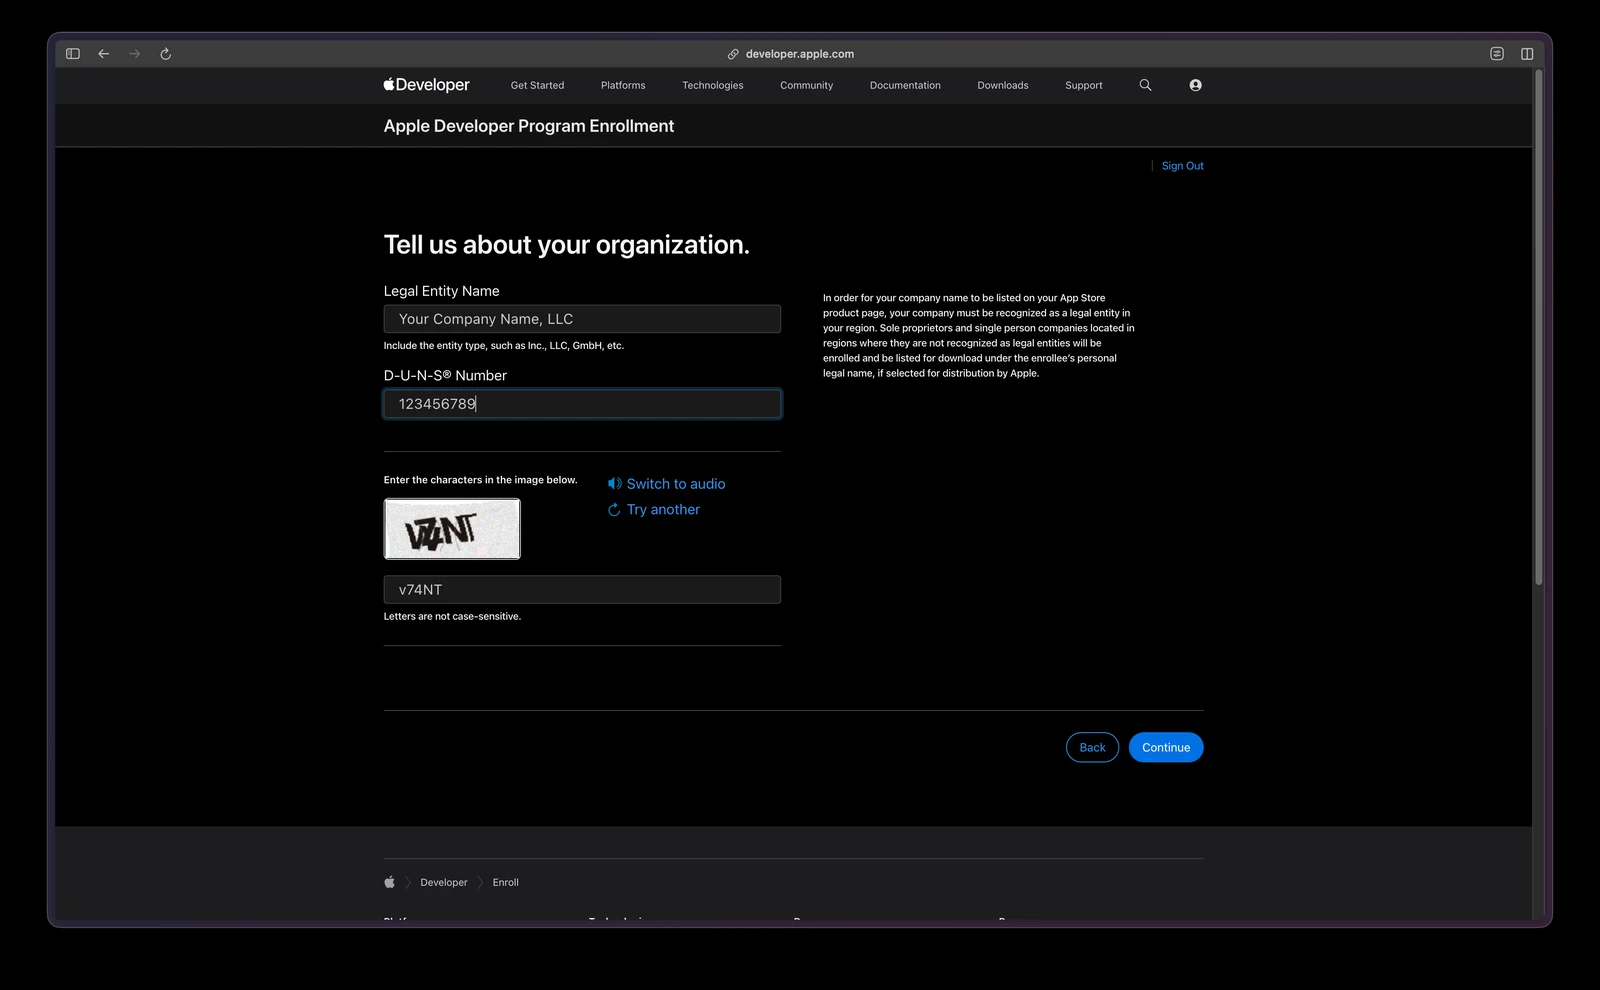
- Legal Entity Name — include the entity type (Inc., LLC, GmbH). Apple's own hint: "Include the entity type, such as Inc., LLC, GmbH, etc."
- D-U-N-S® Number — the nine digits from your lookup.
- Solve the image captcha (letters aren't case-sensitive; you can switch to audio or request a different image).
Click Continue.
Step 11 — Confirm your address (pulled from Dun & Bradstreet)
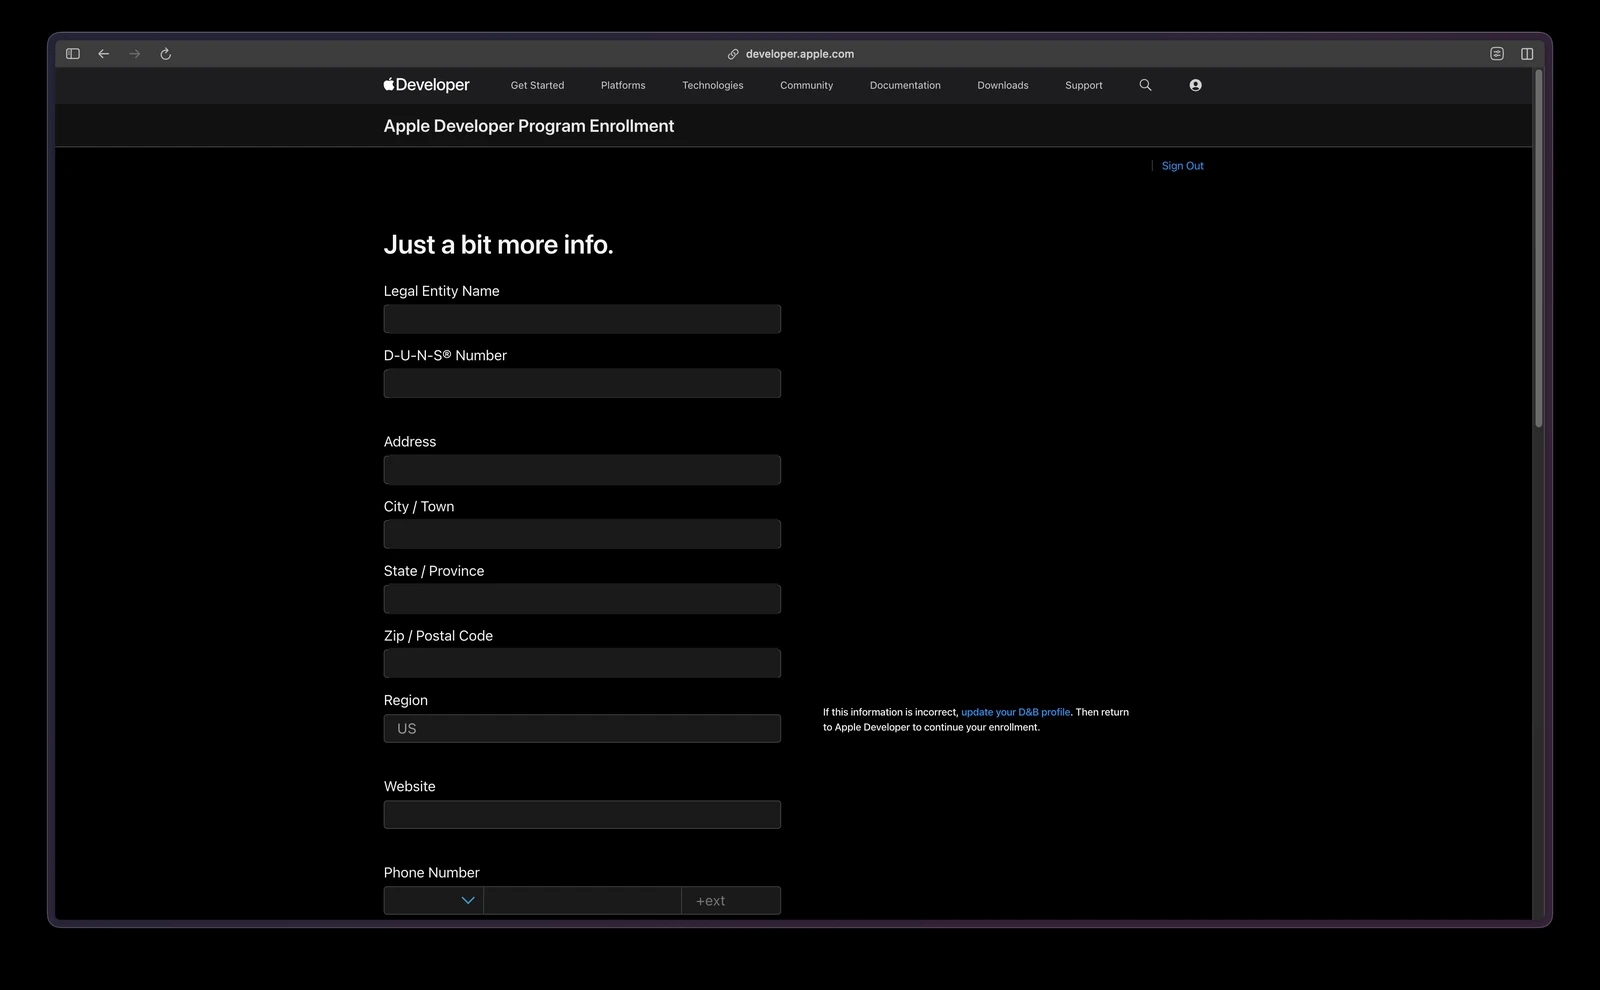
Apple pre-fills your address, city, state, ZIP, and region straight from your D&B record — and these fields are read-only. You cannot type over them.
Step 12 — Website, phone, signing authority, and work email
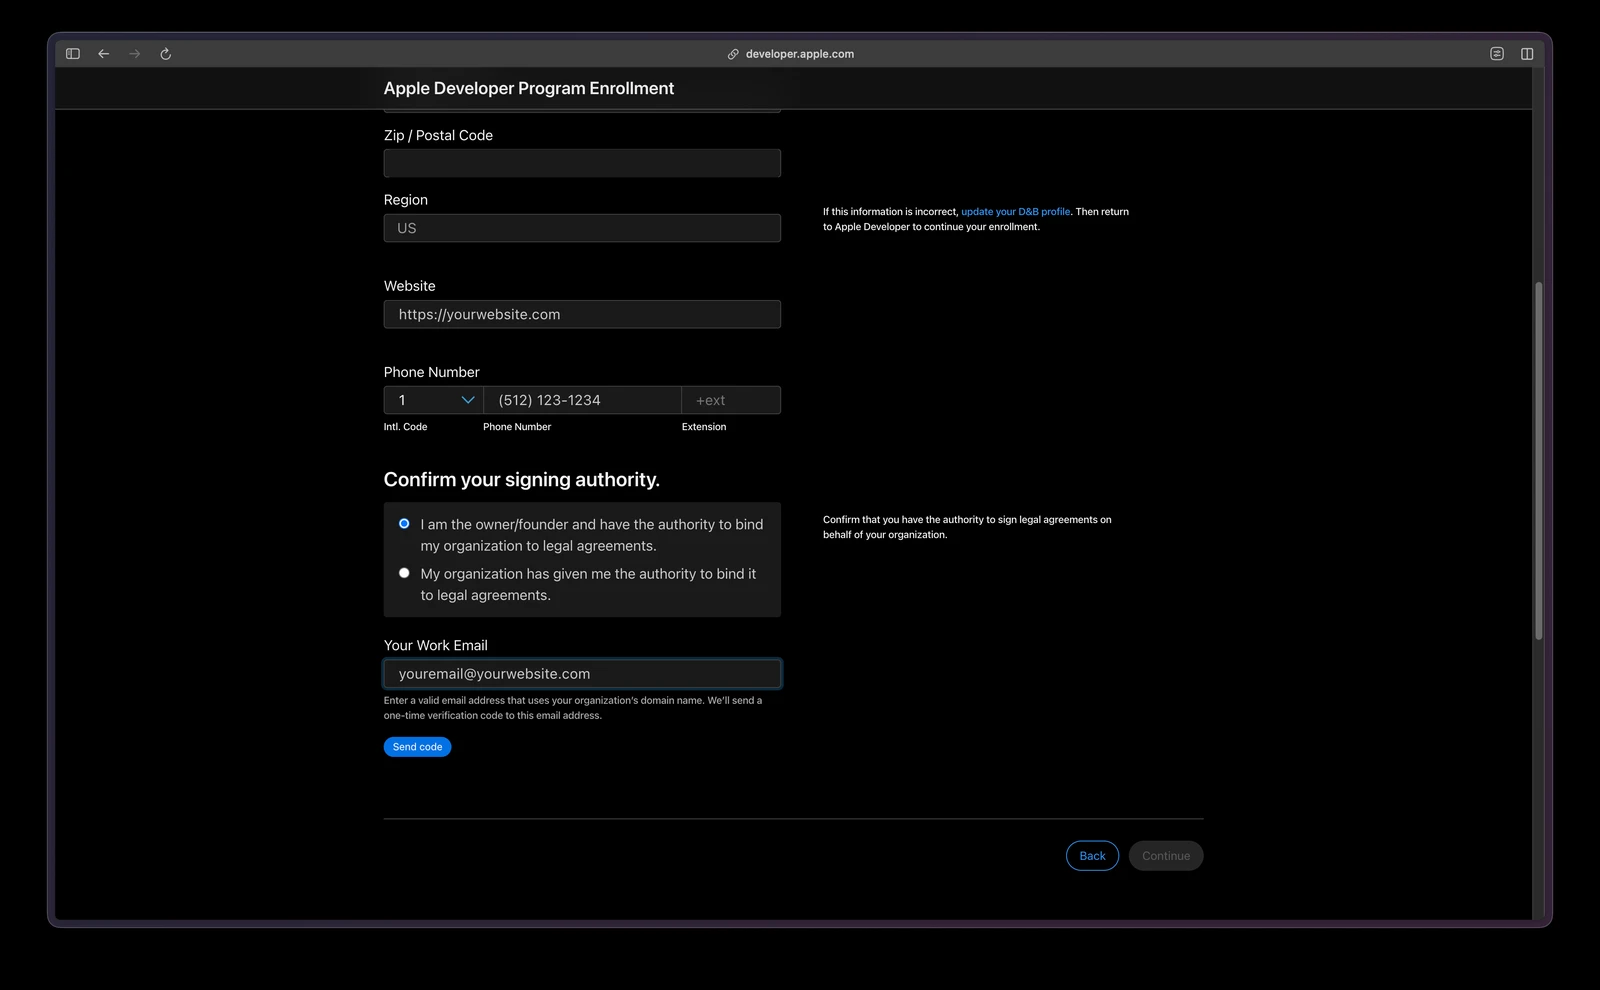
Scroll down and fill in:
- Website — your company's public site, on your own domain.
- Phone Number — with country code.
- Confirm your signing authority — pick one: "I am the owner/founder and have the authority to bind my organization to legal agreements" or "My organization has given me the authority to bind it to legal agreements."
- Your Work Email — must use your organization's domain. Click Send code, then enter the one-time code Apple emails you. Continue stays greyed out until the code is verified.
Step 13 — Save your Enrollment ID
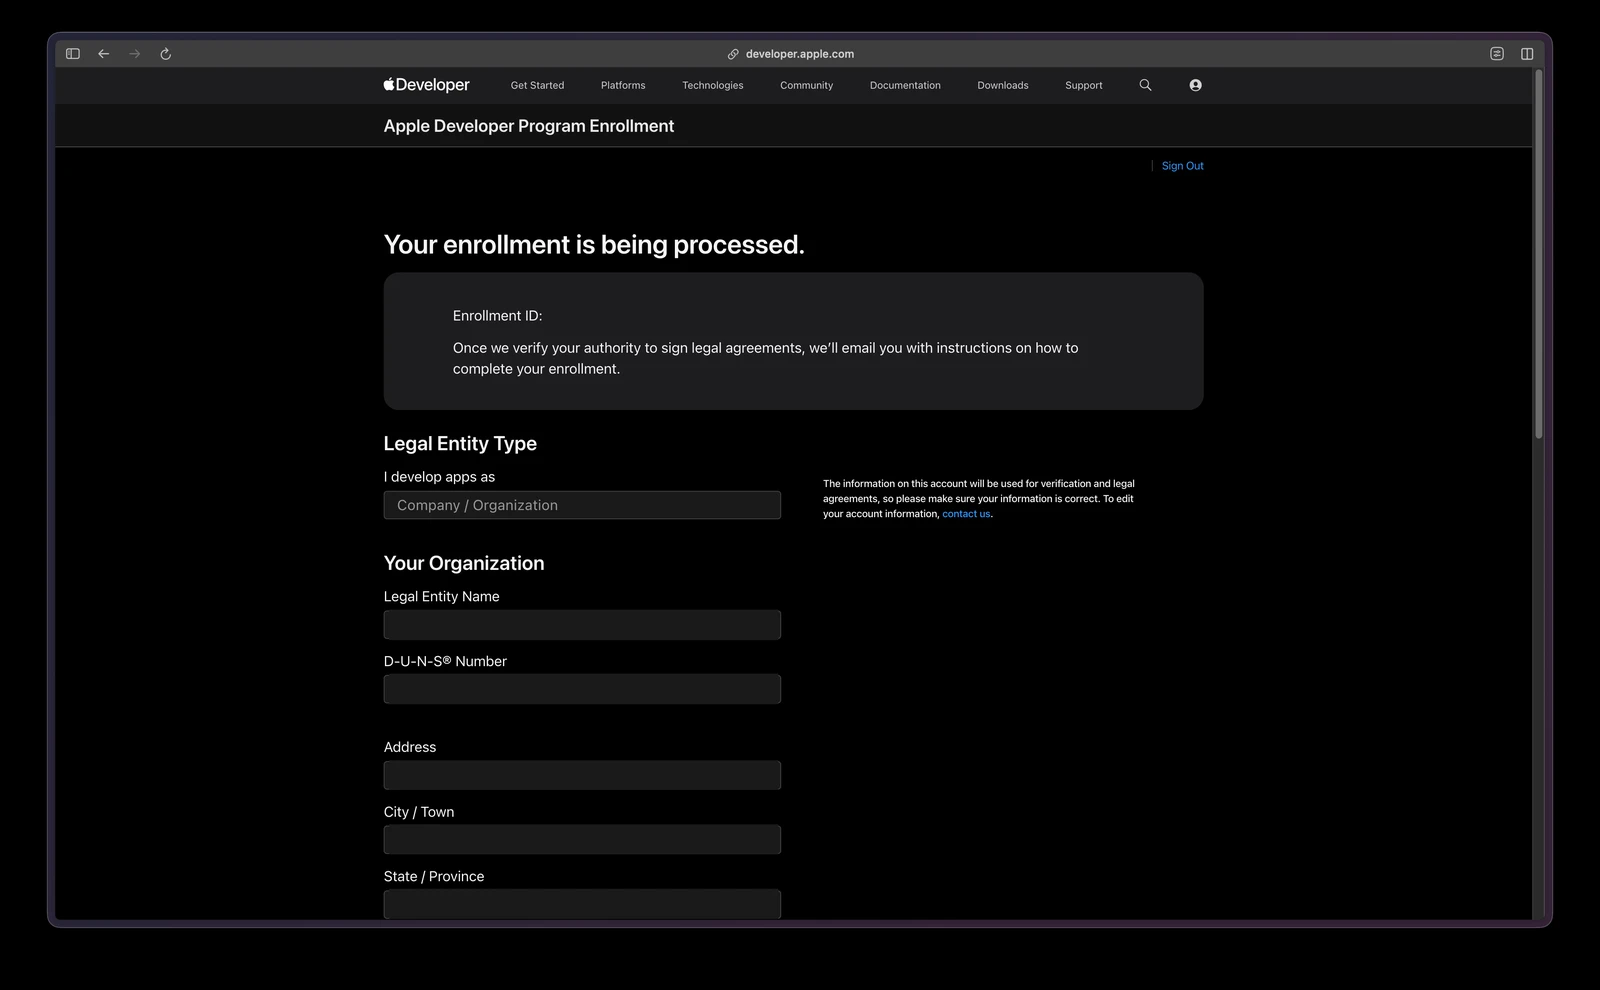
You'll see "Your enrollment is being processed" with an Enrollment ID and a read-only summary of everything you submitted. Apple's message: "Once we verify your authority to sign legal agreements, we'll email you with instructions on how to complete your enrollment."
Step 14 — Send Apple your documents
Expect an email within a few days saying Apple can't verify your identity and your association with the enrolling entity, asking for documents. This is routine — it is not a rejection. Ours read:
Upload at developer.apple.com/contact/file-upload.
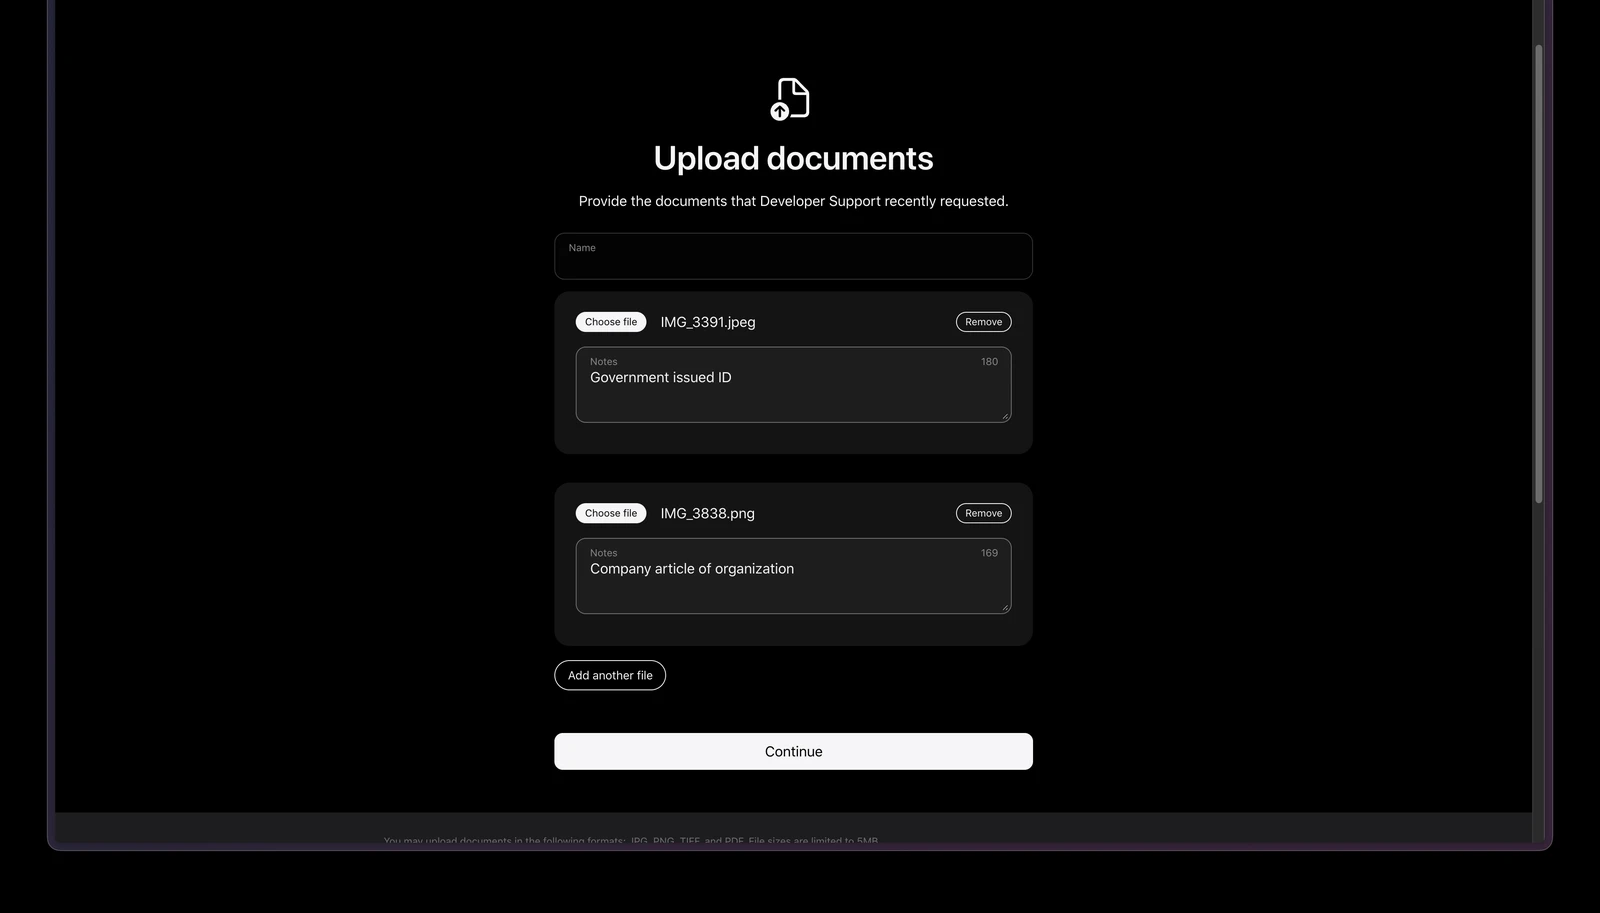
Enter your name, then add one file at a time with Choose file, and use the Notes field to label each one ("Government issued ID", "Company articles of organization"). Click Add another file for each additional document, then Continue.
- Accepted formats: JPG, PNG, TIFF, PDF
- Max 5 MB per file — phone photos of documents often exceed this; compress them first
- Documents must be in English, Spanish, French, Italian, German, Brazilian Portuguese, Chinese, Japanese, or Korean. Anything else needs a solicitor-certified English translation.
Step 15 — Approval, license agreement, and payment
Once Apple verifies everything, you'll get an email with next steps: review and accept the Apple Developer Program License Agreement, then purchase the USD 99 annual membership with your card. Organizations can't pay before approval, so this email is the green light.
Step 16 — Invite OpenCourt to your account
Once your membership is active, add us so we can build and publish your app:
-
Open App Store Connect and go to Users and Access → People.
-
Click the + button above the list of users.
-
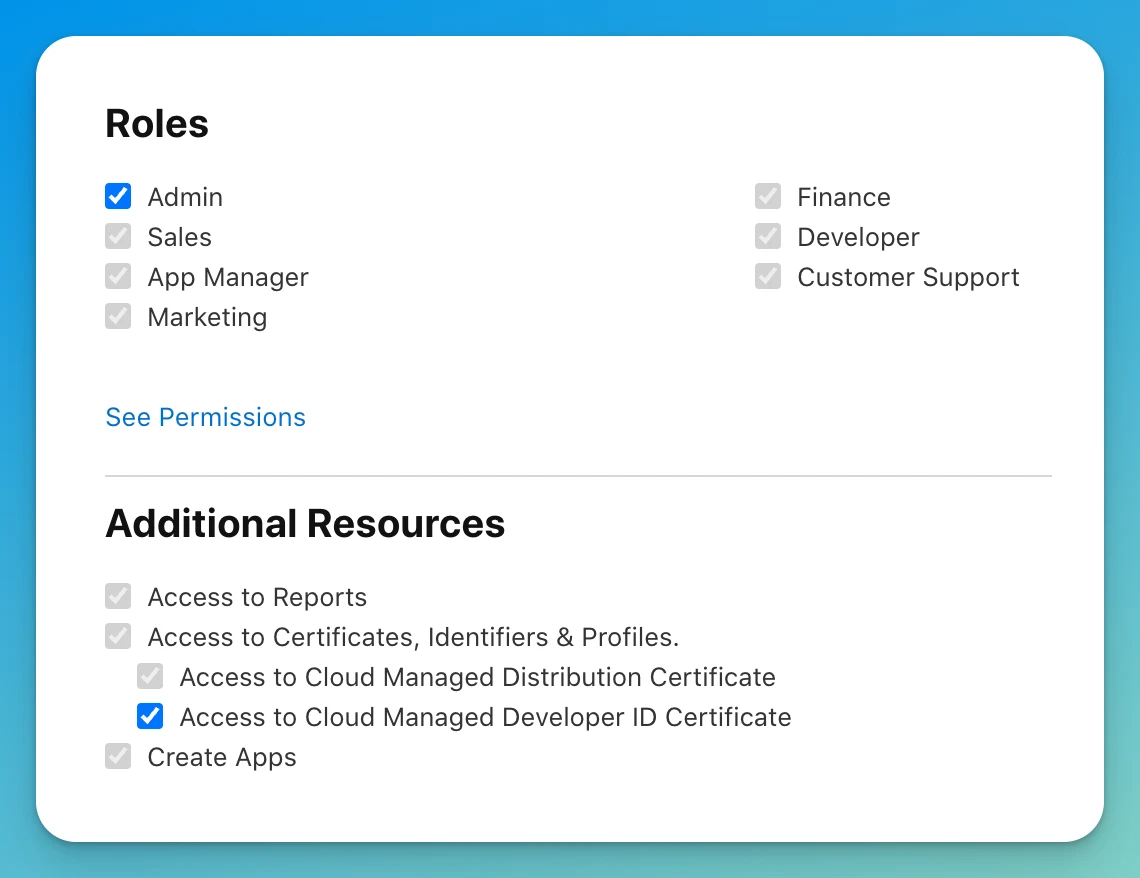
Enter apps@getopencourt.com and assign the Admin role.
-
Make sure every item in Access to Certificates, Identifiers & Profiles is checked — we need it to create the signing certificates and provisioning profiles your app requires. Without this, we won’t be able to publish the application.
-
Click Invite.
-
Switch on automated publishing: go to Users and Access → Integrations → App Store Connect API and click Request Access. Only the Account Holder (the person who enrolled) can do this.
Keeping your app live
After launch, two things stay yours because the stores only let the account's owner do them:
- Renew the membership every year (keep a valid card on file — auto-renew is safest). A lapse pulls your app from the store until it's paid.
- Accept Apple's Program License Agreement updates when they appear. Apple pushes new terms a few times a year, and until someone at your company clicks accept, we can't ship updates to your app.
Troubleshooting
- "Your organization is not listed as a legal entity." Your D&B record shows a different legal status (often sole proprietorship) or hasn't been verified. Fix it with D&B using your business registration documents. A true single-person business has to enroll as an individual.
- The pre-filled address is wrong and I can't edit it. By design — see Step 11. Update your D&B profile, wait for it to sync to Apple (up to 2 business days), then resume.
- Apple is asking for documents. Normal — see Step 14. Not a rejection.
- My website got rejected. It must be live, on your own domain, with real content and contact information. Social profiles and placeholder pages don't count.
- Apple called and we weren't ready. That's the routine verification call — confirm you're an owner or officer of the named company. If you missed it, request another via Contact Us (see Step 14's callout).
- Nothing has happened in two weeks. Contact Apple Developer Support with your Enrollment ID, or request a phone call: Contact Us → Membership and Account → Program Enrollment → Phone → "Call Me" (US business hours only; otherwise request an email callback).
- We can't find the Request Access button. Only the Account Holder (the person who enrolled) sees it — make sure you're signed in with that Apple Account.
Already have a personal Apple Developer account?
If the Apple Account you sign in with already has an individual Apple Developer membership, Apple offers "Change from an individual to an organization account" instead of a fresh enrollment.
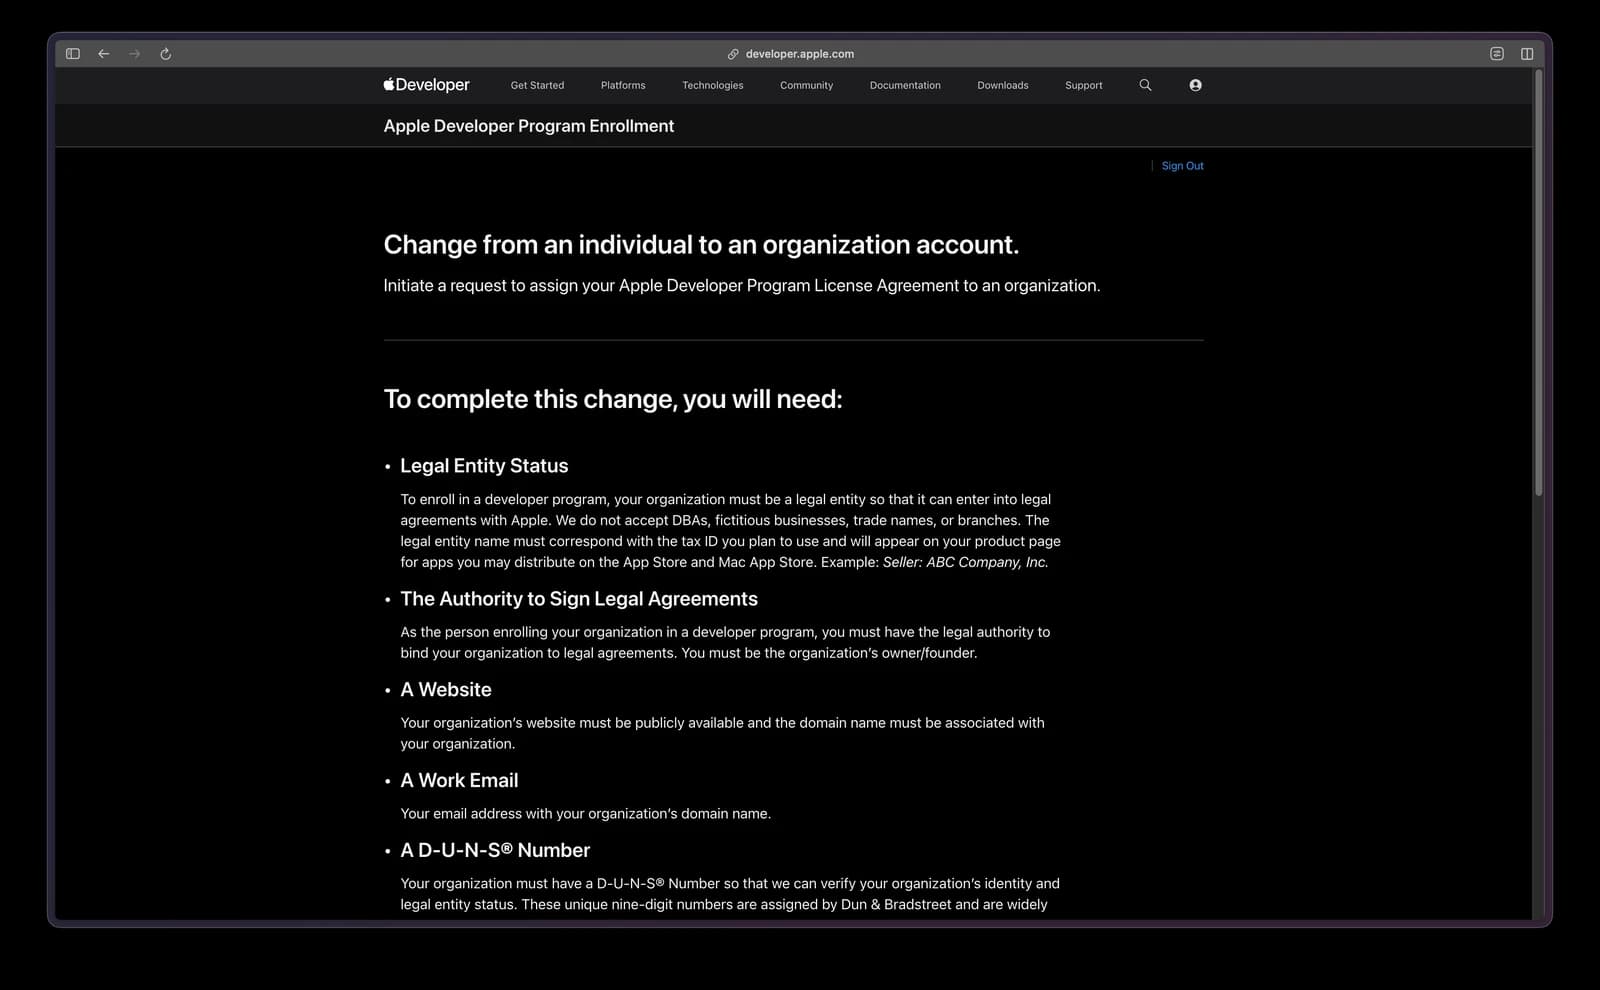
It lists the same requirements — legal entity status, authority to sign, a website, a work email, and a D-U-N-S number — with a Check now link to the D-U-N-S lookup. Click Continue.
From here you're back on the main flow at Step 10.
Get your D-U-N-S number
How to find or request your free D-U-N-S number — the business ID Apple and Google require to publish your branded (white-label) app.
Create your Google Play account and invite OpenCourt
Set up the Google Play account your branded (white-label) Android app is published under, and invite OpenCourt.