

Send emails from your own domain
Add your own domain with two DNS records, choose a From address on it, and keep the domain verified.
Send your booking and event emails from an address at your own domain, such as bookings@yourclub.com instead of notifications@getopencourt.com. You add the domain, publish two DNS records, then choose the address. (About ten minutes of setup, then up to a few hours of waiting for DNS.)
Before you begin
- A domain your club owns, such as yourclub.com. A Gmail, Yahoo, or Outlook address does not work.
- Access to your domain's DNS records, usually at the company your domain is registered with. If someone else manages your website, send them this article. They add the two records, and you click the verify button.
- Nothing changes for your customers while you wait. Your booking and event emails keep sending from OpenCourt's address until the domain is verified.
Add your sending domain
- Go to Settings → Email settings.
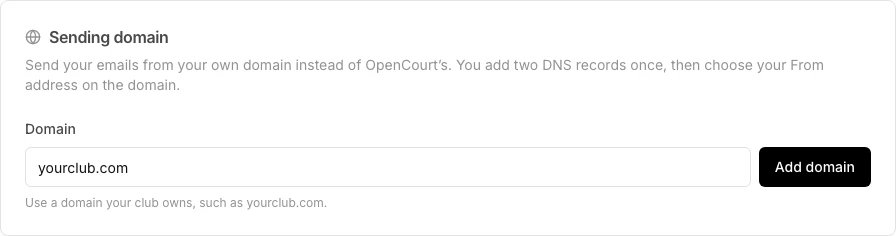
- In the Sending domain card, type your domain into Domain — for example yourclub.com.
- Click Add domain.
The card now shows Waiting for DNS records and the records to publish.
Add the two DNS records
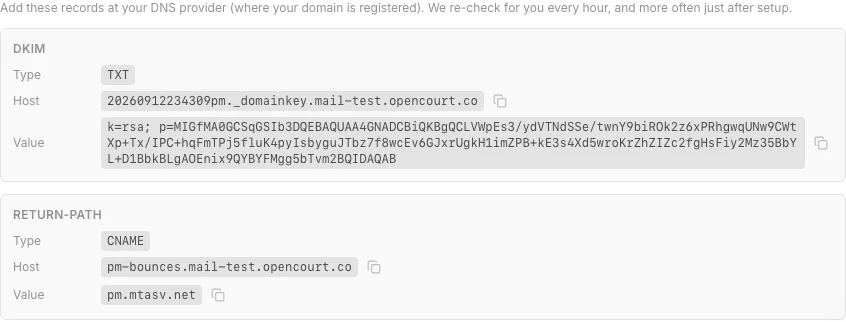
The card lists a DKIM record and a Return-Path record. Each shows a Type, a Host, and a Value, with a copy button beside the host and the value.
- Open your DNS provider — the company your domain is registered with.
- Add a record of type TXT. Paste the DKIM Host into the name or host field, and the DKIM Value into the value field.
- Add a record of type CNAME. Paste the Return-Path Host into the name field, and the Return-Path Value into the target or points-to field.
- Save both records.
Should I add the DMARC record?
Below the two records, the card can show a DMARC row. It is optional — your domain verifies without it — but it helps your emails reach the inbox.
- If the card says DMARC is already published, there is nothing to do.
- If the card recommends one, add a record of type TXT with the host and value the card shows.
Choose your From address
You do not have to wait for DNS. Choose the address now, and your booking and event emails switch to it as soon as the domain is verified.
If OpenCourt runs email campaigns for your club, wait until the domain is verified. Campaigns switch to the new address as soon as you click Save.
- In the Sender identity card, find From address.
- Click Choose address.
- Type the part before the @ — for example bookings. Your domain is filled in after it.
- Click Save.
Until the domain verifies, the row shows Waiting for verification, and your booking and event emails keep sending from notifications@getopencourt.com.

Verify the domain
- In the Sending domain card, click Check verification.
- If both records are visible, the card turns green: Domain verified. Your emails now send from your From address.
- If one or both are not visible yet, the card stays amber and tells you it is still waiting. DNS changes take anywhere from a few minutes to a few hours to spread. Wait and check again.
You do not have to come back to the page. OpenCourt checks the records on its own and verifies the domain when they appear.
What each status means
| Sending domain card | From address row | What your emails do |
|---|---|---|
| Waiting for DNS records | Waiting for verification | Send from OpenCourt's address |
| Domain verified | Verified | Send from your address |
| Re-checking your DNS | Re-checking | Still send from your address |
| Branded sending paused | Paused | Send from OpenCourt's address again |
If a record is later deleted or changed, OpenCourt emails your club's admins with the records to republish. Your emails never stop — only the From address changes back to OpenCourt's until you fix it.
After your domain verifies
- Replies follow your From address. If you have not set a separate reply-to, customer replies go to your From address. To send them somewhere else, see Set your email sender name and reply-to address.
- Keep the records in place. If you delete or change either record, your emails switch back to OpenCourt's address.
- Send yourself a test. Once the domain is verified and you have chosen a From address, a Send test email button appears next to Check verification. It sends a message to your own admin email address, so you see the email as a customer would.
Change your From address
In the Sender identity card, click Change on the From address row, type the new part before the @, and click Save. The domain stays the same, so there is nothing to verify again.
Go back to OpenCourt's address
In the Sending domain card, click Remove domain, then confirm with Remove domain. Your emails go back to sending from notifications@getopencourt.com straight away, and your From address on that domain is cleared. You can add the domain again at any time.
If something goes wrong
- "Enter a domain like yourclub.com or mail.yourclub.com" — type only the domain, without https://.
- "This domain is already connected to another club on OpenCourt" — if that is wrong, email support@getopencourt.com.
- The From address row has no Choose address button — add your domain in the Sending domain card first.
- Verification still fails after a day — check the host field at your DNS provider. The most common cause is a doubled domain, such as a record saved at pm-bounces.yourclub.com.yourclub.com. Also compare the value character for character against the card.
- A verified domain changed to Branded sending paused — one of the two records was deleted or edited. Republish it from the card, then click Check verification.